The Web Developer Bootcamp
이 강의노트는 Udemy에서 Colt Steele - The Web Developer Bootcamp를 보고 작성하였습니다.
01 - Introduction to this Course
Important resources에 대한 설명, 강의진행방식, Syllabus 등
Section1 - 8강에 강의노트와 학생들이 정리한 노트의 다운로드 링크 있음
02 - Introduction to Front End Development
인터넷이 작동하는 원리, 프론트엔드 개발자와 백엔드 개발자에 대한 간략한 설명
03 - Introduction to HTML
HTML은 HyperText Markup Language의 약자로 웹페이지의 구조를 만드는 언어입니다. 프론트엔드에서 중요한 3가지 언어가 있는데 HTML, CSS, JavaScript입니다. HTML은 웹페이지의 명사, CSS는 형용사, JS는 동사라고 보면 됩니다. HTML에 관해 모르는 것이 나왔을 때 참조할만한 사이트로는 w3schools과 MDN을 추천합니다.
HTML은 크게 Document, Elements 그리고 Attributes로 이루어져 있습니다.
- Document
-
<!DOCTYPE html> <html lang="en" dir="ltr"> <head> <!-- Our metadata goes here --> <meta charset="utf-8"> <title></title> </head> <body> <!-- Our content goes here --> </body> </html> <html>: lang은 language, dir은 언어가 왼쪽에서 오른쪽으로 기술된다는 방향성을 의미합니다.<head>: 웹페이지에 보이지는 않지만 CSS 링크, 메타데이터(문서작성자, 키워드 등)에 대한 정보를 담고 있습니다.<body>: 문서의 content를 담고 있습니다.
-
- Elements
- content와 opening tag, closing tag로 이루어져 있습니다.
<p>Paragraph</p>,<img src="macpro.png">등 ……
- Attributes
- Tag에 추가적인 정보를 주는 것입니다.
<p class="main">Main Paragraph</p>,<a href="www.google.com">Go to Google</a>,<img src="macpro.png">등 ……
04 - Intermediate HTML
Table: 표를 만듭니다.
<table style="width:100%"> # style은 attribute입니다.
  <caption>Monthly savings</caption> # table 상단에 caption을 추가
  <tr> # table의 행
    <th>Month</th> # table header
    <th>Savings</th>
  </tr>
  <tr>
    <td>January</td> # table cell
    <td>$100</td>
  </tr>
  <tr>
    <td>February</td>
    <td>$50</td>
  </tr>
</table>
Form: User input을 collect하기 위해 사용됩니다.
<!-- action attribute는 form data가 전송될 url이며 method attribute는 HTTP request의 type입니다. -->
<form action="index.html" method="post">
  <!-- 다음의 div tag안의 값은 서버에 first-name=input-value&last-name=input-value 형태로 전달됩니다. -->
  <div>
    <!-- label의 for와 input의 id가 같으면 연결됩니다. -->
    <label for="first-name">First Name:</label>
    <!-- required는 input의 값이 비어있지 않은지 검증합니다. -->
    <input type="text" name="first-name" id="first-name" placeholder="John" required />
    <label for="last-name">Last Name:</label>
    <input type="text" name="last-name" id="last-name" placeholder="Smith" required />
  </div>

   <div>
      <label for="radio-choice-1">Male</label>
      <input type="radio" name="radio-choice" id="radio-choice-1" value="choice-1" />

      <label for="radio-choice-2">Female</label>
      <input type="radio" name="radio-choice" id="radio-choice-2" value="choice-2" />

     <label for="radio-choice-3">Other</label>
      <input type="radio" name="radio-choice" id="radio-choice-3" value="choice-3" />
   </div>

  <div>
    <label for="email">Email:</label>
    <input type="email" name="email" id="email" required placeholder="your email">

    <label for="password">Password:</label>
    <input type="password" name="password" id="password" pattern=".{5,10}" placeholder="your password" required title="5 to 10 characters">
  </div>

  <div>
    <label for="select-choice">Birthday:</label>
    <select name="select-choice" id="select-choice">
      <option value="0" selected disabled>Month</option>
      <option value="january">Jan</option>
      <option value="february">Feb</option>
      <option value="march">Mar</option>
    </select>
    <select name="birthday-day" id="day">
      <option value="0" selected disabled>Day</option>
      <option value="1">1</option>
      <option value="2">2</option>
    </select>
    <select name="birthday-year" id="year">
      <option value="0" selected disabled>Year</option>
      <option value="2015">2015</option>
      <option value="2014">2014</option>
      <option value="2013">2013</option>
    </select>
  </div>

  <div>
    <label for="checkbox">I agree to the terms and conditions</label>
    <input type="checkbox" name="checkbox" id="checkbox" />
  </div>

  <div>
    <input type="submit" value="Submit" />
  </div>
</form>
05 - Introduction to CSS
CSS는 HTML에 style을 주는 언어입니다. CSS에 관해 모르는 것이 나왔을 때 참조할만한 사이트로는 w3schools과 MDN을 추천합니다.
HTML에 style을 주는 방법은 3가지가 있습니다. 첫번째는 개별 Element에 직접 style을 입력하는 것입니다.
<h3 style="color: pink;">blah blah blah </h3>
두번째는 Head tag안에 style을 입력하는 것입니다.
<head>
  <title>About Rusty</title>
  <style type="text/css">
    li {
      color: red;
    }
  </style>
</head>
세번째는 별도의 css파일을 생성하여 link로 연결시키는 것입니다. 관리의 효율성으로 인해 마지막 방법이 가장 많이 쓰이고 있습니다.
<head>
  <link rel="stylesheet" type="text/css" href="app.css">
</head>
# app.css

selector {
  property: value;
}
CSS에서 주로 쓰이는 색깔표기의 종류는 Hexadecimal(16진법), RGB, RGBA(RGB에 투명도 추가)가 있습니다. style이 여러가지 적용되었을 때는 뒤에 입력된 코드가 적용됩니다.
h1 {
  /* Hexa */
  color: #2c3e50; # favorite navy
  /* RGB */
  color: rgb(236, 240, 241); # favorite gray
  /* RGBA */
  color: rgba(11, 99, 150, .6);
}
Selector Exercise
/* Give the all element a background of #bdc3c7 */
* {
  background: #bdc3c7;
}

/* Make the <h1> element #9b59b6 */
h1 {
  color: #9b59b6;
}

/* Make all <h2> elements orange */
h2 {
  color: orange;
}

/* Make all <li> elements blue(pick your own hexadecimal blue) */
li {
  color: #0040FF;
}

/* Change the background on every paragraph to be yellow */
p {
  background: yellow;
}

/* Make all inputs have a 3px red border */
input {
  border: 3px solid red;
}

/* Give everything with the class 'hello' a white background */
.hello {
  background: white;
}

/* Give the element with id 'special' a 2px solid blue border(pick your own rgb blue) */
#special {
  border: 2px solid rgb(0, 100, 200);
}

/* Descendant selector: Make all the <p>'s that are nested inside of divs 25px font(font-size: 25px) */
div p {
  font-size: 25px;
}

/* Make only inputs with type 'text' have a gray background */
input[type="text"]{
  background: gray;
}

/* Give both <p>'s inside the 3rd <div> a pink background */
 div:nth-of-type(3) p {
   background: pink;
}

/* Give the 2nd <p> inside the 3rd <div> a 5px white border */
div:nth-of-type(3) p:nth-of-type(2){
  border: 5px solid white;
}

/* Make the <em> in the 3rd <div> element white and 20px font(font-size:20px) */
div:nth-of-type(3) em {
  color: white;
  font-size: 20px;
}

/* BONUS CHALLENGES */
/* You may need to research some other selectors and properties */

/* Make all "checked" checkboxes have a left margin of 50px(margin-left: 50px) */
input:checked{
  margin-left: 50px;
}

/* Make the <label> elements all UPPERCASE without changing the HTML(definitely look this one up */
label{
  text-transform: uppercase;
}

/* Make the first letter of the element with id 'special' green and 100px font size(font-size: 100) */
#special:first-letter{
  color: green;
  font-size: 100px;
}

/* Make the <h1> element's color change to blue when hovered over */
h1:hover {
  color: blue;
}

/* Make the <a> element's that have been visited gray */
a:visited {
  color:gray;
}
06 - Intermediate CSS
Font
body {
  font-family: Arial;
  font-size: 2em; # 부모요소 글자크기의 2배
  font-weight: 100; # 글자의 굵기, 보통 bold는 700
  line-height: 1.6; # 행간의 간격, 1.6이 무난함
  text-align: justify; # center, left, right, justify 값을 가짐
  text-decoration: underline; # overline, line-through(가운데) 등의 값을 가짐
}
- font-size
- px: 웹브라우저의 기본px은 보통 16px이며 정적인 값입니다.
- em: 부모요소 글자크기 대비 상대적인 크기로 동적인 값입니다.
- rem: 최상위요소 글자크기 대비 상대적인 크기로 동적인 값입니다.
- font-weight
- normal, bold, lighter, bolder, 100 ~ 900의 값을 가집니다.
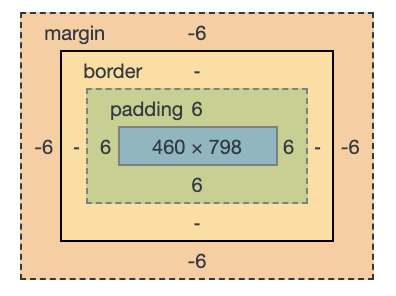
Box Model
p {
  /* Margin and Padding: %, px, auto 값을 가질 수 있으며 padding도 동일(auto제외)하다 */
  margin: top right bottom left; # 4개를 기재할 시 적용순서
  margin: top (right and left) bottom; # 3개를 기재할 시 적용순서
  margin: (top and bottom) (right and left); # 2개를 기재할 시 적용순서
  margin: (top and bottom right and left); # 1개를 기재할 시 적용순서

  /* Border: */
  border: 5px solid red; # width, style, color 순으로 기재, 개별적으로도 지정 가능
  border-radius: 5px; # 모서리를 둥글게 함
  box-shadow: 0 2px 4px 0
    rgba(0,0,0,0.16),0 2px 10px 0
    rgba(0,0,0,0.12); # 그림자효과
}
07 - Bootstrap
Bootstrap Link: Click!
<!-- Bootstrap v4.3을 사용하려면 head tag와 body tag에 Bootstrap CDN을 추가해야 함-->

<!doctype html>
<html lang="en">
  <head>
    <!-- Required meta tags -->
    <meta charset="utf-8">
    <meta name="viewport" content="width=device-width, initial-scale=1, shrink-to-fit=no">

    <!-- Bootstrap CSS -->
    <link rel="stylesheet" href="https://stackpath.bootstrapcdn.com/bootstrap/4.3.1/css/bootstrap.min.css" integrity="sha384-ggOyR0iXCbMQv3Xipma34MD+dH/1fQ784/j6cY/iJTQUOhcWr7x9JvoRxT2MZw1T" crossorigin="anonymous">

    <title>Hello, world!</title>
  </head>
  <body>
    <h1>Hello, world!</h1>

    <!-- Optional JavaScript -->
    <!-- jQuery first, then Popper.js, then Bootstrap JS -->
    <script src="https://code.jquery.com/jquery-3.3.1.slim.min.js" integrity="sha384-q8i/X+965DzO0rT7abK41JStQIAqVgRVzpbzo5smXKp4YfRvH+8abtTE1Pi6jizo" crossorigin="anonymous"></script>
    <script src="https://cdnjs.cloudflare.com/ajax/libs/popper.js/1.14.7/umd/popper.min.js" integrity="sha384-UO2eT0CpHqdSJQ6hJty5KVphtPhzWj9WO1clHTMGa3JDZwrnQq4sF86dIHNDz0W1" crossorigin="anonymous"></script>
    <script src="https://stackpath.bootstrapcdn.com/bootstrap/4.3.1/js/bootstrap.min.js" integrity="sha384-JjSmVgyd0p3pXB1rRibZUAYoIIy6OrQ6VrjIEaFf/nJGzIxFDsf4x0xIM+B07jRM" crossorigin="anonymous"></script>
  </body>
</html>
08 - Bootstrap 4!
Bootstrap3와 Bootstrap4의 차이점과 Bootstrap4의 기본사항
09 - Bootstrap 4: Flexbox and Layout
Bootstrap4를 활용하여 Pattern Project와 Museum of Candy 만들기
10 - Introduction to JavaScript
JS의 5가지 주요 Datatype: Numbers, Strings, Booleans, Null, Undefined
// Input을 받는 What is your name? 팝업창을 띄우고 해당 input을 변수 userName에 저장
var userName = prompt("What is your name?");

// Nice to meet you "userName" 팝업창을 띄움
alert("Nice to meet you, " + userName);

// 브라우저에 보이지 않지만 console창에 Also great to meet you "userName" 로그남김
console.log("Also great to meet you, " + userName);
var firstName = prompt("What is your first name?");
var lastName = prompt("What is your last name?");
var age = prompt("What is your age?");

var fullName = firstName + " " + lastName

console.log("Your full name is " + fullName);
console.log("You are " + age + " years old");
var age = prompt("What is your age?")
var days = age * 365.25;
alert(age + " years is roughly " + days + " days");
11 - Javascript Basics: Control Flow
Bollean Logic, Conditionals, While Loops, For Loops
// Conditionals
var secretNumber = 4; //create secretNumber

var stringGuess = prompt("Guess a number"); //ask user for guess
var guess = Number(stringGuess);

if(guess === secretNumber) { //check if guess is right
	alert("YOU GOT IT RIGHT!");
}

else if(guess > secretNumber){ //check if guess is higher
	alert("Too high.  Guess again!");
}

else { //otherwise, check if lower
	alert("Too low.  Guess again!");
}
// While and For loops
console.log("PRINTING ALL EVEN BETWEEN 10 AND 40");
var counter = 10;
while(counter <= 40){
	console.log(counter);
	counter+=2;
}

console.log("PRINTING ALL EVEN BETWEEN 10 AND 40");
for(var i = 10; i <= 40; i += 1){
	if(i % 2 === 0) {
		console.log(i);
	}
}

console.log("PRINTING ALL NUMBERS DIVISIBLE BY 5 AND 3 BETWEEN 5 AND 50");
var counter = 5;
while(counter <= 50){
	if(counter % 5 === 0 && counter % 3 === 0){
		console.log(counter);
	}
	counter+=1;
}

console.log("PRINTING ALL NUMBERS DIVISIBLE BY 5 AND 3 BETWEEN 5 AND 50");
for(var i = 5; i <= 50; i++){
	if(i % 5 === 0 && i % 3 === 0) {
		console.log(i);
	}
}
// indexOf
var answer = prompt("are we there yet?");
while(answer.indexOf("yes") === -1) {
	var answer = prompt("are we there yet?");
}
alert("YAY, WE MADE IT!!!");